|
|
Post by Little Amy on Mar 3, 2007 10:19:04 GMT 10
haha... little amy.. I liked that ♥! So, I did I little research for you noora and apparently XnView is an excellent program! But it's more like Picasa, it organizes, resizes, rotates, crops and does a bunch of other minor repairs to your images. It also has some editing tools such as: filters (blur, average, emboss, ...), effects (lens, wave, ...). I think you can have good results with it, although, I've never used it. Then I recommend you GIMP, it is really great for a free program. Don't believe me? Check this community out: GimpTutorial (later on if you like the program this community can really help you to learn new things!) Here's a screen-shot(sorry for the german, you do can choose the language ^^"): Click Me! \o/Here's the link to download it: No! Click Me, I'm Better! ~\o/Hope I was of any help! Questions, just ask! ^^ |
|
wave
Marquise of Luby
 ... goranholic ...
Posts: 256
|
Post by wave on Mar 3, 2007 11:28:06 GMT 10
thank you, Molly! I'll try that out soon!  |
|
|
|
Post by Noora on Mar 3, 2007 19:42:06 GMT 10
Little Amy, THANK YOU SO SO MUCH!!! Thousand tack! Gracias.  (?) Karma here to there, asap. |
|
|
|
Post by carsley on Mar 5, 2007 3:59:00 GMT 10
haha... little amy.. I liked that ♥! moahahahaha. ^^ me - smart . me - make new nickname for amy. me call amy - little amy.'   |
|
|
|
Post by PiperxoxLeo on Mar 7, 2007 9:17:58 GMT 10
No problem Magda and wave. Glad I could help. |
|
|
|
Post by carsley on Mar 7, 2007 16:29:38 GMT 10
My quiestins never end .. Haha. I have a new one. I just made my first real ''mini movie avvie''. But .. mine dont look like Amys *adore amy*. SO AMY, HOW DO I DO? |
|
|
|
Post by PiperxoxLeo on Mar 9, 2007 0:58:59 GMT 10
Mine didn't look like Amy's either. Mine sucked. Everyone has their own way of doing them though. Also, Amy do you use PowerDVD to cap your scenes? If anyone wants any colouring tutorials of anything they see me make I am willing to make some tutorials. If I have the time and you ask nicely.  |
|
|
|
Post by carsley on Mar 9, 2007 1:02:20 GMT 10
I have actully (I mean, really, WOW) figured out how to do them. But only because I found amazing caps. I need amazing caps, or I cant do it .. So for me, it is ALL about luck ... |
|
|
|
Post by PiperxoxLeo on Mar 9, 2007 1:03:20 GMT 10
I make my own using PowerDVD but my trial ran out and I can't find a version on Limewire to download.
|
|
|
|
Post by Mrs. Zebra (aka Roosje) on Mar 9, 2007 1:03:41 GMT 10
It looks pretty, Magda. Molly, I'd love to see some of your coloring tutorials. I always love your coloring, so bring it on! |
|
|
|
Post by PiperxoxLeo on Mar 9, 2007 5:18:22 GMT 10
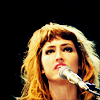
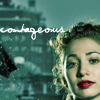
Okies, I'll do one from my latest batch of icons I made. It's a simple tutorial and is easily translated for any graphics program. I made it using Adobe Photoshop CS2 but I am sure Paint Shop Pro users and such can do it. This tutorial is image heavy. (a.k.a there will be a lot of images on this page so for those who have dial up it may take some time to load.) The tutorial wont work for every image so fiddle with the opacities etc. We're going to go from this to  1. Get your image. Then crop it to 100x100px.  2. Duplicate your base three times and set each layer to Screen 100% (like I said, depending on your image you may only need to duplicate it once or twice. Fiddle with your layers.)  3. Create a new layer. (Ctrl+Shift+N) Fill it with #011537 and set this layer to Exclusion 100%. Then duplicate this layer.  +  4. This bit may be different on various programs. For Photoshop users follow these instructions. Select all (Ctrl+A) Copy the merged layers (Edit>Copy Merged) and then paste (Ctrl+V). Set this layer to Softlight 100%. For those who don't use Photoshop just flatten the image. Duplicate the image and set it to Softlight 100%. It should be the same thing. 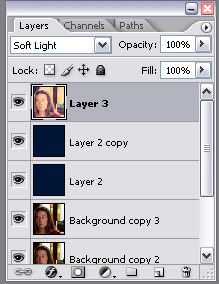 That is what your layers pallete should look like with PS users.  5. Create two new layers below your Softlight image (a.k.a the "Copy Merged Layer") and fill them both #a4ddf4. Set the first one to Colour Burn (Burn on PSP) 38%. Set the second one to Colour Burn (Burn on PSP) 40%.  +  6. Above the blue layers but beneath the "Copy Merged" layer create a new layer and fill it with #eadccd. Set this layer to Colour Burn (Burn on PSP) 49%.  +  7. Create a new layer and fill it with #e6e6e6. Set this layer to Colour Burn (Burn on PSP) 100%.  +  . And there we go. Examples of other icons I made with the same colouring on them are:    If it was confusing or you need help just let me know. Try it out and show me what you come up with. Molly |
|
|
|
Post by Mrs. Zebra (aka Roosje) on Mar 9, 2007 5:37:29 GMT 10
Wow. This looks very awesome, going to try it out tomorrow, as I'm watching ER right now and I'm planning on going to bed early. Very well done.
|
|
|
|
Post by carsley on Mar 11, 2007 23:26:52 GMT 10
yes! wow! but, hey, i dont get the layer thingy! i tried, but mine ddin look like THAT?! haha, maybe i'll try again! you learned me how to make stripes, then everything is possible!! thnx hun! trying again! |
|
|
|
Post by PiperxoxLeo on Mar 22, 2007 3:05:23 GMT 10
Hey Magda, did you get the hang of it?
|
|
|
|
Post by carsley on Mar 22, 2007 3:30:48 GMT 10
honestly. no.  i am so slow |
|


 (?)
(?)