|
|
Post by Ergirl on Apr 2, 2007 4:00:28 GMT 10
All these tutorials are fab! Thanks for posing them everyone  Karma to you all for the brill help! xxxx |
|
|
|
Post by Mrs. Zebra (aka Roosje) on Apr 3, 2007 3:59:34 GMT 10
Another tut. From  to  Using Photoshop CS2 - Includes Selective Coloring and Color Balance Duplicate your base and set it to screen. Fill a new layer with #161649 and set it to Exclusion 100% Duplicate your base and set it to soft light. Drag it to the top. Fill a new layer with #befbfc and set it to Color Burn 100% Create a new Hue/Saturation layer (Layer>New Adjustment Layer > Hue/Saturation) and set Saturation to +25. Create a new Selective Color layer (Layer>New Adjustment Layer > Selective Color): Neutrals Cyan 0 Magenta +16 Yellow 0 Black 0 Create a new Color Balance Layer (Layer > New Adjustment Layer > Color Balance) with the following settings (Use Midtones method): Cyan - Red 0 Magenta - Green -29 Yellow - Blue +14 Add some text and you're done. The font I used is Schindler Small Caps and the brush is by daisuki_icons @ LJ. |
|
|
|
Post by PiperxoxLeo on Apr 3, 2007 4:33:57 GMT 10
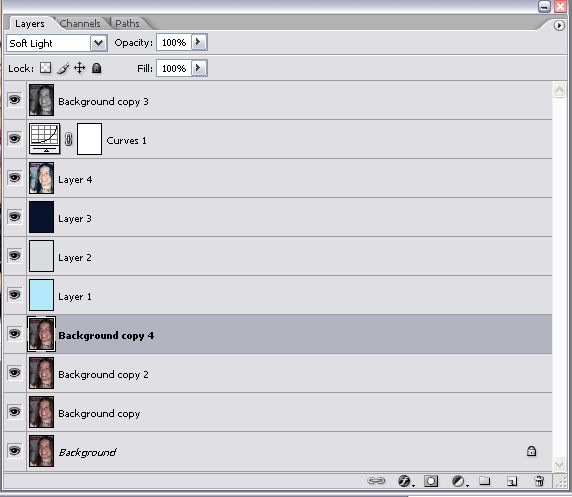
Oh, that's nice. I may try it out. I am gona do another one. I did it using Photoshop CS2 and Curves so if you don't understand curves...then you may not understand this tutorial. We are going from this to this. 1. Create a new image at 300x400 and then crop your image to whatever size you want. (Or whatever size you are working with.) 2. Duplicate the base three times and set the first two layers to Screen 100% and set the last to Softlight 100%. 3. Create a new layer. (Cntrl.Shift.N.) Fill this with b1e9fa. Set this to Colourburn at 100%. 4. Create another new layer (Cntrl.Shift.N) and fill this with d8dcdf. Set this to Colourburn 100%. 5. Create another new layer. (Cntrl.Shift.N.) and fill this with 07132d. Set this to Exclusion at 100%. 6. This is a bit tricky. Select the entire image [Select-All] and then Copy Merge the image. [Edit-Copy Merged]. Then paste this and set this layer to Softlight 100%. 7. This is the other tricky part. This is the Curves layer. If you don't understand curves then you may not be able to do this. Create a new Curves layer. [Layer-New Adjustment Layer-Curves] RGB - 137.115 Red - Leave it alone. Green - 163.170 Blue - 94.68 8. Duplicate your base, drag it to the top and desaturate it and set this to Softlight 58%. Your layers pallete should look like this: And there we go. If you have any problems let me know. |
|
|
|
Post by carsley on Apr 4, 2007 20:29:12 GMT 10
Good jobs!  here I go again .. - press ctrl + L > 69, 1,00, 197 - press ''ok'' when you got like it like you want it!
- take the ''tone over''
 , press it, and choose color, i uses #FFFFFF, totally white, and kinda, drag it, where you want it, i'll be a line, so where the link is, the clors comes. fix the opactity, to 30%-80% , press it, and choose color, i uses #FFFFFF, totally white, and kinda, drag it, where you want it, i'll be a line, so where the link is, the clors comes. fix the opactity, to 30%-80%

- add some text if you want that, and you are done!! <3
1.  2.  3.  |
|
|
|
Post by Noora on Apr 7, 2007 3:17:29 GMT 10
|
|
|
|
Post by Mrs. Zebra (aka Roosje) on Apr 7, 2007 4:05:49 GMT 10
Click setup |
|
|
|
Post by Noora on Apr 7, 2007 4:11:08 GMT 10
Click setup Hee hee I already tried that, but it didn't let me open the file or something. |
|
|
|
Post by carsley on Apr 7, 2007 5:44:19 GMT 10
can you please send us a pic of that to, pllz, hun? <3 |
|
|
|
Post by Noora on Apr 7, 2007 6:19:06 GMT 10
|
|
|
|
Post by carsley on Apr 7, 2007 17:08:53 GMT 10
OMG! YEAY!!! OMG!! YOU HAVE PHOTOSHOP! AMAZING!!! TOTALLY AMAZING!! <33 AND I, I SAW MÄMMI, ON TE SUPERMARKET YESTERDAY, SO I AM FREAKIN' OUT TO!! YAAAAAAY!!! and for everyone. here is a great link with totouials: BLEED LIKE MEAND PLEASE NOTICE. I noticed two things. - You MUST register to see the totorials!
- And you need to be .. cool. lol.
ps. i am mkaing a totourial of my own, animated one. lol. YEEY. |
|
|
|
Post by Noora on Apr 7, 2007 20:26:57 GMT 10
Mämmi's gettin' soooo popular  ! HELP HELP HELP - How to use layers?
- Do I have to do them myself?
- ..or is there a site where to find them?
*desperate* |
|
|
|
Post by carsley on Apr 7, 2007 20:49:38 GMT 10
answers on your desperate questions. a layer (crtl + shift + N = new layer) is like this: this picture, which i just cuted out (ctrl + x) just has ONE LAYER. IT IS THE LAYER. THIS PICTURE BELOW IS ONE LAYER. IT IS THE LAYER.  and if noora wants to add a text, you just press the ''T'', and press wherever you want, which you proabably know aldready, and then , it AUTOMATICLY IS A NEW LAYER. THE LAYER IS A TEXT LAYER. and if you want to add brushes, texturest ect, press CTRL + shift + N, DO THAT!!! and add like this; 1.  2.  there you should know a little about the layers, and wht u can do. the opactity, you can lods of things with- if you take new (crtl+N) and pase a pic there, change the pics opacity to around 50< and the pic is dissaperaring .. ^^ ADDING BRUSHERS AND TEXTURES.1. i usall do like this. ^ above, where i told you about the opacity thing, we are gonna use that here now. ^^ 2. we'll use this texture;  3. change the pic size (abby) to 100x100px. and make a new layer. (crtl+shift+N), do that now.  4. LIKE THE PICS SAYS. CHANGE THE OPACITY! layers is to help you. layers, yes, you make them yourself. nnono, no site lol *preying to god you understood that* i suck at explain things ...  |
|
|
|
Post by Ergirl on Apr 8, 2007 4:05:37 GMT 10
|
|
|
|
Post by carsley on Apr 8, 2007 5:28:12 GMT 10
what you did is that you made the picture darker. of you used RBG colors, you need to go on feeling, and if you used one tot. above, there has been some RBG using there, yes. so, try again, and go for feeling! <3 and if you dont manige, just add my msn, it is easier to take it that way! |
|
|
|
Post by Ergirl on Apr 8, 2007 22:51:25 GMT 10
Ok... i hadnt actually done anything to the picture to make it dark...thats how it opens...but if i change the brightness/contrast it seems to work ok... Im really rubbish at all this...even when i try following all your awesome tutorials something seems to go wrong...oh well, il just keep trying xxx |
|


 !
!